Deploying A Django Application using Gunicorn, Supervisor and NGINX on AWS EC2
Introduction
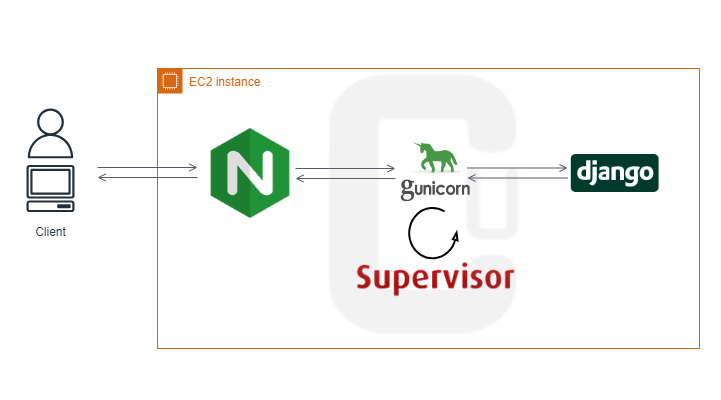
In this guide, we'll delve into the process of deploying a Django application on an AWS EC2 instance, leveraging the power of Gunicorn, Supervisor, and Nginx. This combination offers a robust, scalable, and secure solution for hosting your Django web application.

Key Technologies and Their Roles
- Django: The core python framework that powers our web application.
- Gunicorn: A Python WSGI HTTP Server that efficiently handles HTTP requests and forwards them to our Django application.
- Supervisor: This is a process supervisor that monitors and manages the Gunicorn processes, ensuring their availability and automatic restarts in the event that they go down or the server is restarted.
- Nginx: This is a high-performance web server and reverse proxy that distributes traffic to our Gunicorn workers, it also handles static files, and can provide some security features.
- AWS EC2: Provides the virtual server infrastructure where your application and its components will reside.
How The Technologies Work Together
- Client Request: A user's browser sends an HTTP request to the Nginx server.
- Nginx Receives Request: Nginx receives the request and forwards it to a Gunicorn worker process.
- Gunicorn Handles Request: The Gunicorn worker process handles the request, interacts with the Django application, and generates a HTTP response.
- Response to Client: The response is sent back to Nginx, which then forwards it to the client's browser.
- Supervisor Monitoring: Supervisor monitors the Gunicorn processes, restarting them if necessary to ensure continuous service.
Setting Up EC2 Instance
- Create a new account or log into an existing AWS account via the AWS Management Console.
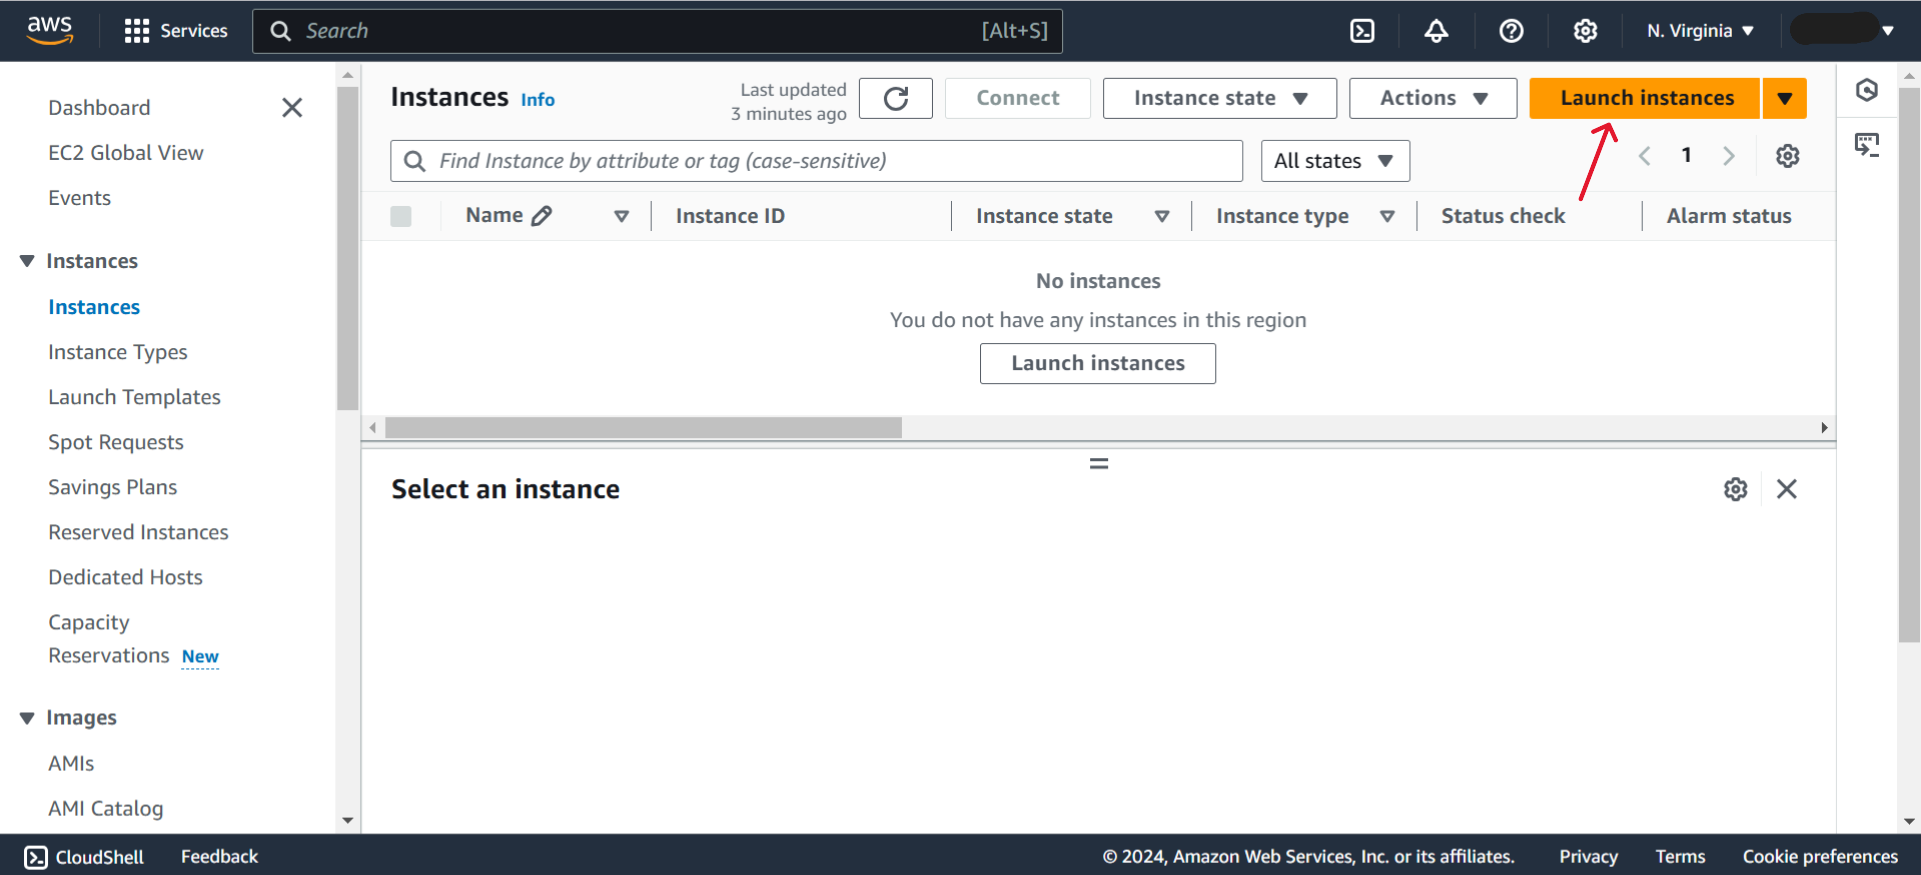
- Under services search for and select EC2
Click on instances and click on ‘Launch Instances’

Enter Server name
Select the Ubuntu AMI
Select the t2.micro if you want to stay on the Free tier.
Under Network Settings Allow SSH, HTTP and HTTPS
On the Summary pane on the right, confirm your set up and click on launch instance.
You should see a success banner after a successful launch.
Connecting Securely to the EC2 Instance
There are multiple ways (read this to learn how to connect via PuTTY) to connect to an EC2 instance however, to keep things simple we will use the Amazon EC2 Instance Connect method
Navigate to EC2 > Instances > Select your instance > Click on Connect
On the Connect to Instance page, click on connect
Update Ubuntu packages on the server
- Run the command
sudo apt-get update - Run the command
sudo apt-get upgrade - Confirm python installation
python3 –version
Set up python virtual environment
- Download the virtualenv package: Run the command
sudo apt-get install virtualenv - Create a new virtual environment: Run the command
virtualenv venvom - Activate the virtual environment:
source ./venv/bin/activate
Pull Django Application from GitHub
Let us assume we are deploying a portfolio site in my github repository.
- Clone Repository: Within the EC2 terminal run
git clone https://github.com/charlesu49/portfolio - Install Dependencies: Use pip to install required packages:
pip install -r requirements.txt
Install Gunicorn
Install Gunicorn: Run the command pip install gunicorn to install gunicorn
Install and configure Supervisor
- Install Supervisor: Run the command sudo apt-get install supervisor to install supervisor.
- Configure supervisor
cd /etc/supervisor/conf.d/sudo touch gunicorn.conf/sudo nano gunicorn.conf[program:gunicorn] directory:/home/ubuntu/portfolio command=/home/ubuntu/venv/bin/gunicorn --workers 3 --bind unix:/home/ubuntu/portfolio/app.sock portfolio.wsgi:application autostart=true autorestart=true stderr_logfile=/var/log/gunicorn/gunicorn.err.log stdout_logfile=/var/log/gunicorn/gunicorn.out.log [group:guni] programs:gunicorn- Save and close file (CTRL + O > Enter > CTRL + X)
- Create log directory: Run the command
mkdir /var/log/gunicorn/to create log directory - Configure supervisor to read the configuration:
sudo supervisorctl reread - Start gunicorn in the background using supervisor:
sudo supervisorctl update Check supervisor status:
sudo supervisorctl statusEnsure you see RUNNING as shown below:
Install and configure Nginx
- Install nginx:
sudo apt-get install -y nginx Confirm installation: Open your browser and type in the IPV4 address of your instance and you should see the below page:
- Configure Nginx
cd /etc/nginx/-
sudo nano nginx.confChange the user www-data to any other configured user with necessary permissions. For the purpose of this test we will be using root to avoid any permission issues (this is not advised in a production setting) cd /etc/nginx/sites-available/Create a config file for this projects:
sudo nano portfolio.confserver { listen 80; server_name <public_ipv4_address> <domain name e.g: charlesudo.com>; location / { include proxy_params; proxy_pass http://unix:/home/ubuntu/portfolio/app.sock; } # Static files location /static/ { alias /home/ubuntu/portfolio/staticfiles/; } # Media files location /media/ { alias /home/ubuntu/portfolio/media/; } }- Close and save file (CTRL + O > Enter > CTRL + X)
- Test that the config is fine:
sudo nginx -t - Enable our site:
sudo ln portfolio.conf /etc/nginx/sites-enabled - Restart the Nginx service:
sudo service nginx restart
Testing Deployment
Open your browser and type in public IPV4 address of your EC2 instance or a domain name mapped to it and you should be able to access your website. If you make a change to your code and push to git hub you can pull the changes on your EC2 server and restart supervisor to see the update by running the command: sudo systemctl restart supervisor
Comments
Sign in to add to the conversation